Hello friends today i will explain you how to hack the Facebook password or accounts remotely using keylogger. Its a 100% working hack and you can easily hack anyone's Facebook account or password using this hack. In this tutorial i will explain you how to hack Facebook and other passwords of any user using 100% FUD keylogger. The keylogger in this tutorial we will discuss is L33ts keylogger adn its 100% FUD(fully undetectable).
Hacking Facebook account is very easy and just requires not more than 10 minutes of work. Don't worry i will also tell you how to protect your facebook account or passwords from such hacks and hackers. But for this you must know how hackers hack your facebook account. So first i teach you how to hack facebook account remotely and then i will tell how to protect yourself from this.
NOTE: This tutorial is for Educational purposes only i.e. to make you aware how hackers hack your Facebook accounts. Please don't misuse it. I am not responsible for any damage caused by you.
So guys lets start hacking Facebook account or passwords....
Steps to hack Facebook account using Keylogger:
1. Creating the Keylogger Server to hack Facebook passwords.
2. Extracting the Icon from installer.
3. Bind the keylogger server with any software setup.
4. How to spread your keylogger or send it to your friends to hack their Facebook accounts or passwords.
2. Extract the file, Now you will get two folders:
a. First one contains Keylogger and Binder
b. Second Contains resource hacker tool.( to extract the icons from installers).
3. Now open the Keylogger. It contains two files one for gmail email and other for password. For this create one test account on Gmail and enter it's details in this.
4. After entering email and password. Set the time interval usually set 3 mins i.e. after how much time you want to receive logs from the user.
5. Now click on send verification mail. This mail is to test that your keylogger is working correctly or not.
6. After you click this you will receive a confirmation mail on test account which will confirm that keylogger is working.
7. Now click on generate to set the mutex (any secret key to make your keylogger FUD) and then click on compile server.
8. Now save the file to desktop or any other location of your choice. Now your server is ready but it can be easily detected.
Step 2.: Extracting the Icon file from any installer(resource hacker)
1. Open the Resource hacker folder and open the reshacker file.
2. Now go to its menu and open any setup file. Suppose we want to attach our keylogger to Ccleaner setup file. So open the Ccleaner setup with resource hacker.
3. Now in menu there is one action button click on it and then click save all resources.
4. Now save all the resources to desktop or any other location of your choice.
5. It consists of two files one is icon file and other is res file . We only need icon file, so you can delete the other file i.e res file.
6. Now we have Icon of installer file(as discussed above Ccleaner setup Icon).
Step 3: Bind the Keylogger server with any software
1. Now Go to keylogger folder and open the Binder.
2. Now Click on + button given below to add files.
3. Now add the keylogger server and the set up of software (i.e. in our case it's Ccleaner setup).
4. Now in menu of Binder, Go to Settings. There select the icon that we have generated in the previous step and set the location of output file as shown in figure.
5. Now again go to File's menu in Binder and click on Bind files.
6. Now your Binded keylogger is ready. Now you have to spread it or send it to the victim that is your friend.
Step4 : How to Spread Keylogger or send it to victim or friend
1. Now you have one Software setup file with keylogger attached with it.(In our case we have Ccleaner setup with keylogger attached with it.
2. Now Spread your keylogger through forums. You might be a member of various forums use them to spread your keylogger in form of software posts. You can use various software's to spread them that users frequently download.
3. Spread it through pendrives or USB hard drives. Suppose a friend asked you for a software give it the software that has keylogger attached with it.
Note: you can also attach keylogger with images also. But that can be detectable by antivirus. So avoid such type of hacking.
So isn't that so easy to hack anyone's Facebook account in just few minutes.
How to protect yourself from these hacks?
Prevention is always better than cure so always follow these steps:
1. Don't use cracked softwares and don't download them from unauthorized websites.
2. Always keep your antivirus and anti-spyware up to date.
3. Always scan the files before transferring them to your USB.
4. Do not allow other users to use your PC i.e password protect it.
Most of us thinks that phishing is very common technique and anyone can detect it. But doing it in smart Ways means its 100% undetectable and victim has to do it for must. Also why I haven't explained this with earlier post ie How to hack an Email Account because this Hack is specific for specific website means you need specific phisher for each website and also you have to take care about creating your account on web hosting accordingly. So guys If you Want to Learn How to Hack Gmail Account or Password then tighten your belts and get ready for awesome hacking experience..
NOTE: This is for Educational Purpose Only. We are not responsible for any damage done by You.
Things That you Need for Hacking Gmail Account Password:
1. Gmail Phisher
2. Free Web hosting Site
3. Little bit of manual Work :p
Introduction to Phishing
If you know little bit of Hacking then Its must for you know About Phishing i.e What is Phishing and how it works and most important How you can protect yourself from getting into the Trap. I will try to explain all of these in my article.
First of all What are Phish pages and what is phishing?? Phish pages are basically the fake pages or virtual pages that looks similar to the original website Page. The only difference is the batch program running in the background i.e Original Webpage sends requests to Gmail server while Phish Page sends request to hacker's php server. Now Phishing is a password hacking technique commonly used by hackers using phish pages that looks similar to original web page. The only difference is the URL in the address bar so Guys One Important Tip for you all always check the Address bar while going to any website .
Now What is Smart Phishing, Normal phishing page sends the password to hacker but it doesn't redirects the page to original website but smart phishing does. Means victim can never know what really happened and his account is got hacked. He will only think that he has entered the wrong password as in second attempt the web page is original and he will be able to login and the most fantastic thing is that the original redirected page has username already entered in it that makes it even smarter.
Now lets come to how it works?? When a user types a Username Password in the the text box,The info is sent to "login.php" which acts as a password logger and redirects the page to "LoginFrame2.htm" which shows "There has been a temporary error Please Try Again" in it . So when the person clicks on try again it redirects to the actual URL so that the victim does not know that your site is a fake site and gets his gmail.com password hacked.
2. Extract the rar file now you will get three files as given below:
gmail.html
log.txt
mail.php
3. Upload all the Three files to any of the free Web hosting server. Remember while creating the account on these servers try the username as nearer as possible to the original URL like mail.gmaile or maile.gmall etc.. As its the most crucial step. Some Free Web hosting servers are given below you can also find few more for yourself.
4. Once you have uploaded all the three files to web hosting server now you have to send these to your victim. This is the most important step regarding smart phishing technique.
Most People use same password for orkut and gmail and here is the main hack lies. What you have to do you have to send the HTML email to the victim which looks similar to the Orkut scrap to his email you can easily do this using simple editing to the existing mail. Just you have to change the link with your phish link and content according to the person likings so that he will surely come inside the trap.
Another technique is that you can send him a request to join a particular community in the format orkut does.
And Last but the most important one Send him mail from Gmail Admin such that "We have seen illegal activity from your account and you need to verify your account and your account is temporarily disabled after this login. To unlock your account Verify your Email and in that link put your Phish link. Now Guys you all will came to know How it works. If you want to Protect yourself its must that you should know what techniques a Hacker can use to hack your Gmail Account.
5. Now After sending phisher to victim, once the user logs in to his Gmail account using your Phisher, his user ID and password are ours..And these are stored in log.txt What you have to do is just refresh your Web hosting account files.
6. The Log.txt file will contain the passwords and look like this:
Thats all Now you have hacked the password of victim. I hope you all have Liked It.
How to Protect Your Gmail Account From Phisher??
1. Always check the URL in the address bar before entering username and password.
2. Never follow any link from your email and any website until u have confirmed the Address bar URL.
3. Never Follow spam mails and "Win lottery or Cash" mails.
To get the Free Security Code, click on the button first:
Note that you need to have a Google Account to click this button. ie. a Gmail email account
Once you click on the button, you will get the Free Security Code.
Please note that the Free Security Code can help you to hack a Facebook account, but your hacking request will be placed on queue and you need to wait until your turn. It will take about few seconds.
If you dont want to wait everytime you want to hack a Facebook account or hack an email account, we advise to use the Premium Security Code, so your hacking attempt will be processed immediately, regardless of the number of requests in the queue.
Watch the video demo to learn how to get the FSC
How to hack a Facebook - REAL WORKING METHODS 2013
How to Hack any Facebook Account Easy and Simple!!!
This is a brand new way to Hack a Facebook Account and get someones Facebook Password that Facebook doesn't yet know about. How to hack Facebook accounts [The Real Working Methods 2013] is here: _http://learntohackaccount.com/
Tutorial on how to "hack" a facebook account: How to hack Facebook account? With this site you can hack any Facebook account, that you need. Online email & password hacking is simple and will take few minutes to get into someones Facebook account.
How to Hack Facebook Password in 5 Ways
This is the most EASIEST and SIMPLEST way of hacking a facebook account.I don't recommend Facebook Phishing pages anymore as people are not that dumb these days to fall for this trick. Today I will tell you the latest approach of Hacking Facebook Passwords or Accounts. Learn how to hack their facebook account and get their password. Phishing, computer and phone spy software, and scams all covered here!
Welcome to the tutorial on how to hack any facebook accounts, in next 24 hours, without keylogging/phishing etc. I see many people asking for help on hacking facebook accounts, or beg others to do it for them. Most of them belive that they can do it instantly only with one click. Yeah, that's easy: just click here to do it.
Phishing is one of the easiest methods that you can use to hack Facebook accounts or any other email accounts. I will explain how you can Hack Facebook accounts by using a Phisher (fake login page).
Searches related to
how to hack a facebook account
how to hack a facebook account without downloading anything
how to hack a facebook password
how to hack a facebook account for free no download
how to hack someones facebook account
crack facebook account
view private facebook account
hack facebook login
how to hack a facebook account password without downloading anything
How to hack a Facebook account Free + Working 2013
Hello and welcome to Fun & Hacks! In this post i will show you how hack a facebook account via 3 trusted friends method. To do this trick, you must have 3 facebook account and those accounts must be in your victims friend list . Follow the below steps carefully :-
1-Collect few information about the victim's facebook account i.e. email address & username
2-After collecting ,go to facebook.com and click on forgot password
3- Now you will be redirected to a new page where you will have to fill up a form with victim's email address , username & facebook name and then click on search.
4-Now in the new page just click on no longer have access to this?
5-After that, Facebook will ask you to enter new email address. Just enter your email id or create a new one for safety purpose . After filling up, click on submit.
6-Than facebook will promote you to enter the Security question. Simply enter 3-4 wrong answers and it will take you to the 3 trusted friends recovery page. Click on continue.
7- Now select your 3 facebook accounts one by one and after selecting, facebook will send security codes to those accounts. Just enter those codes and you will get password resetting email from facebook in your email account.
In this way you can hack a facebook account, but i don't know for how many days this thick will last.
Windows 8 is rife with features and behaviors that conspire to perplex even the most experienced PC users. Not all of them are bad, per se, but few of them are immediately intuitive. Making matters worse, the OS was primarily designed for touch control, and as a result, many mouse and keyboard commands feel like tacked-on afterthoughts.
But help is on the way.
We've assembled a list of our favorite Windows 8 shortcuts, tricks, and workarounds. Many focus on making the most of the OS on a traditional desktop PC, so if you're interested in touch gestures, please check out our article that focuses directly on the Windows 8 touch experience. Now let's start our journey of discovery with a look at easy-to-use (though often tough to remember!) Windows 8 hotkey commands.
Employ the hottest hotkeys we know
In these key combinations, hold down the Windows key (normally located between Alt and Ctrl) and another key, as described on this list.
Press the Windows key to enter the tiled Start screen.
The Windows key + M minimizes everything that's showing on the desktop.
The Windows key + E opens Explorer for quick access to folders.
On the Start screen, press the Windows key + D to instantly get to the desktop.
The Windows key + Tab opens a list of currently running programs.
The Windows key + Print Screen takes a screenshot and saves it in a Screenshots folder nested in your Pictures folder.
To take a screenshot on a Windows 8 tablet, simultaneously press the Windows button and the volume-down button on the tablet chassis.
The Windows key + Q opens a global search menu. Type what you're looking for and where you would like to look.
The Windows key + W opens a search in your system settings to quickly locate and change system properties.
The Windows key + F opens a file and folder search.
The Windows key + Pause opens the system properties page to show you a quick rundown of your specs.
The Windows key + "," (that's the comma sign!) makes all current windows transparent, giving you a peek at the desktop as long as you hold down the Windows key.
The Windows key + "." (the period) snaps a window to the right or left side (toggling each time you press ".").
The Windows key + R prompts the Run command—useful for quickly launching apps and other routines with a command prompt.
The Windows key + X opens the Quick Access Menu, exposing system functionality such as the Command Prompt, Disk Management, File Explorer, Run, and more. Alternatively, you can right-click on the bottom right corner of the screen to spawn the Quick Access Menu.
The Windows key + I opens the settings menu, giving you quick access to the Control Panel, Personalization, and your Power button, among other features.
The Windows key + O locks orientation on devices with an accelerometer.
Zoom in tight
See all your tiles and groups at once with semantic zoom.
The Start Screen is full of nice, big, chunky tiles that represent all your apps. The tiles are easy to see in small groups, but what if you have hundreds of apps installed? Most will be hidden from view, unless you want to do a lot of scrolling. Enter the new semantic zoom feature. If you’re using a touch display, squeeze the Start screen with two fingers to receive a bird’s eye view of your entire screen contents. And the feature is also available to mouse and keyboard users: Simply hold down the Ctrl button, and use your mouse wheel to zoom in and out.
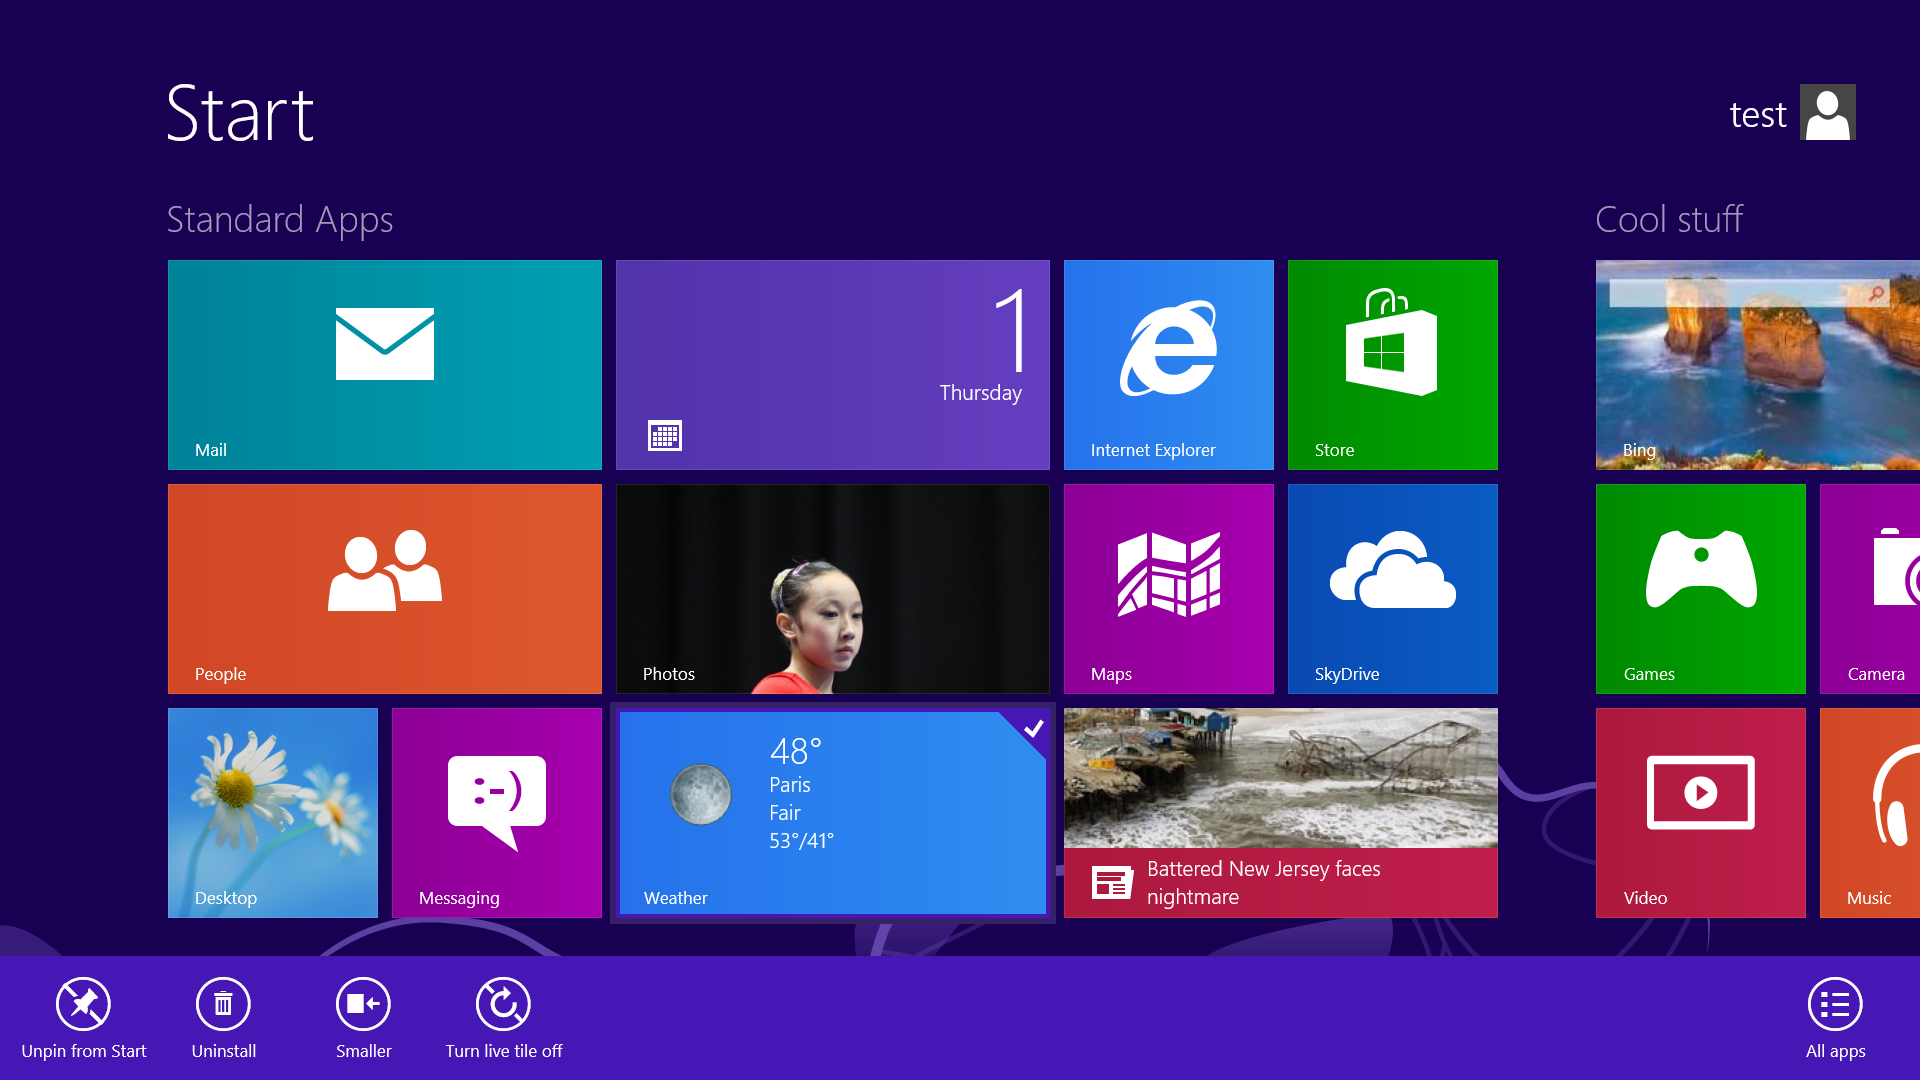
Categorize your apps
Start screen customization for the organized.
Your Start screen can become a cluttered mess if you collect too many apps and other elements that have been pinned to the screen as tiles, so take advantage of built-in organization tools that let you divide everything into labeled groups.
First, drag all the tiles you want to assign to a single group to the far right-hand side of your Start screen in vacant territory; the OS should sequester the tiles together. Once you're satisfied with your assembly, use semantic zoom (described above) to get a bird's eye view of your desktop. Now right-click the group (or simply drag down on it), and select the "Name group" option on the left of the bar that appears below. Type in the name, and enjoy your newly organized Start screen!
Close an application
Closing an app sounds simple enough, but you'll quickly notice that close buttons are hard to find in Windows 8. That's because Microsoft encourages us to run apps in the background where they'll take up minimal resources, but still be accessible at any time.
Nonetheless, if you insist on being rebellious, you can close an app by dragging it with your mouse or finger from the top of the screen all the way down to the bottom. As you drag, the app will miminize into a thumbnail, and when you reach the bottom, it will disappear from view. Alternatively, you can still close apps via Alt + F4 and through the Task Manager.
Use centralized, contextual search
Search for anything in any app from one place.
The Search function located on the Charms bar is packed with power, letting you search the directories of not only your Windows 8 machine, but also the greater Windows ecosystem. Simply choose the bucket of data you want to sift through—it could be all your installed apps, your system settings, your files, your mail messages, or even an external service like the Windows Store or Bing Maps—type in a keyword, and hit Enter. The Search function will then return the results, perfectly contextualized for the database you’ve addressed
Oh, and how's this for cool? You don't even need to hit the Charms bar to access Search. From the Start screen, simply start typing, and you'll be quickly whisked to the text-entry field for search queries. Try it. It works!
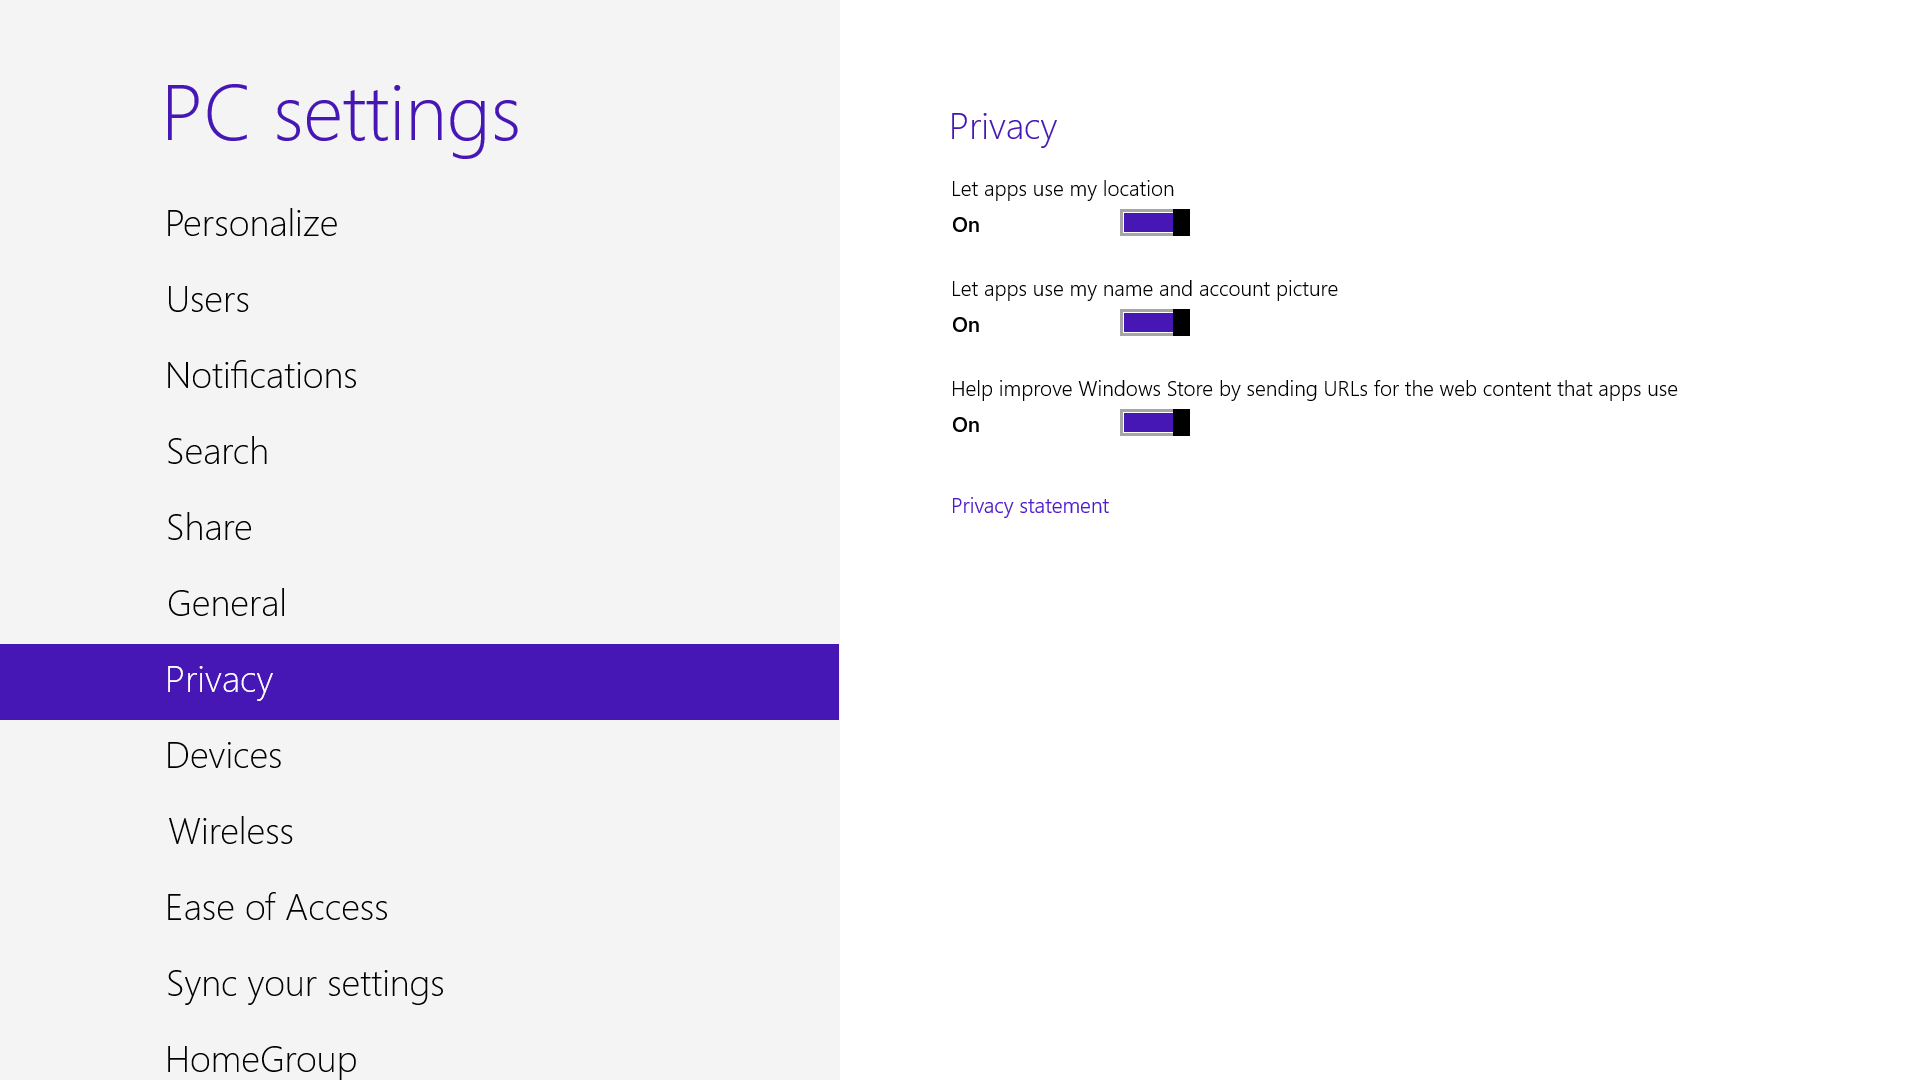
Adjust privacy settings
Customize your privacy settings to your liking.
A lot of apps tap into very personal information by default. Indeed, your pictures, location, and name are liberally woven throughout the system, and like many users you may not be comfortable trusting your machine with that much sensitive data. To adjust the settings, press the Windows key + I, and go to Change PC Settings. Select the Privacy option, and personalize the settings for your personal data there.
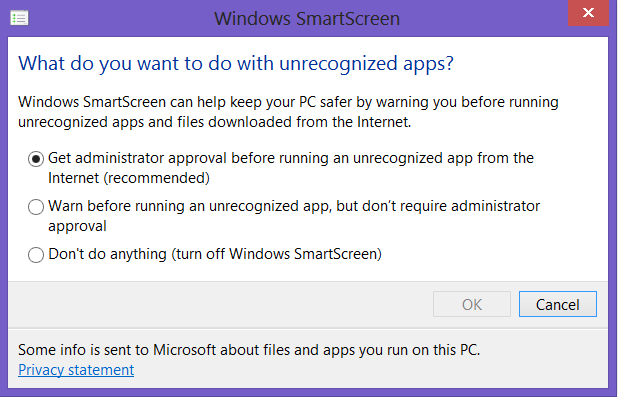
Adjust SmartScreen settings
Choose your own level of safety with SmartScreen.
SmartScreen warns you before running an unrecognized app or file from the Internet. While it's helpful to be aware of a file's source, constant warnings can also get a little annoying. By default, you need an administrator's permission, but this can easily be adjusted to just a warning or no indication at all. Using the magic search function described above, type "security" at the Start screen and find the "Check security status" in the Settings tab. From this area, you can adjust various security settings, including the Windows SmartScreen.
Bring up the Quick Access Menu
The secret Start button for power users is hidden at the bottom-left.
Right-clicking on the lower left of the screen—whether you’re in the Windows 8 Start screen or in the desktop—will bring up the Quick Access Menu, which enables a direct line to many key system management chores, including Disk Management, Task Manager, Device Manager, and Control Panel.
Use Windows 8 apps and your desktop simultaneously
Because the Windows 8 experience is split between new Windows 8 Store apps and old-school desktop apps, the operating system is prone to some strange behaviors. Case in point: When running a multimonitor setup, Windows 8 apps will consume your main screen, leaving your secondary screen running the desktop. This arrangement would seemto allow full-screen multitasking among both types of apps—a modern app on the left side, a desktop app on the right side—but this isn’t the case. Indeed, as soon as you begin using the desktop on your secondary screen, the new-style Windows 8 app disappears, and your primary screen begins running the desktop.
But here’s a workaround. On your primary screen, use the new Windows 8 split-screen “snapping” function to run the desktop and a new Windows 8 Store app together. The desktop can take up the left-hand sliver, while the Windows 8 app consumes the majority of the screen. Now use your second display for a full desktop view. In this arrangement, you can fully multitask between new-style apps and desktop apps, and both windows will be large enough to be useful.
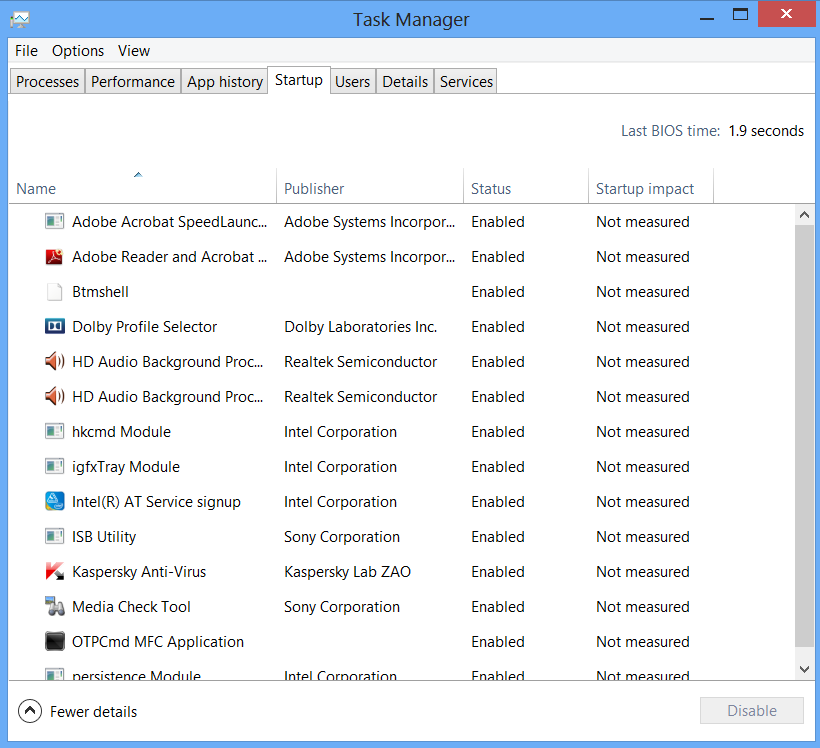
Go to Task Manager for Startup items
Task manager is more useful than ever.
You no longer have to run the MSConfig program to change startup items. Startup items now show up in a tab on Task Manager. Simply press Ctrl + Alt + Del and select Task Manager. Click the "More details" tab at the bottom and find the Startup tab at the top.
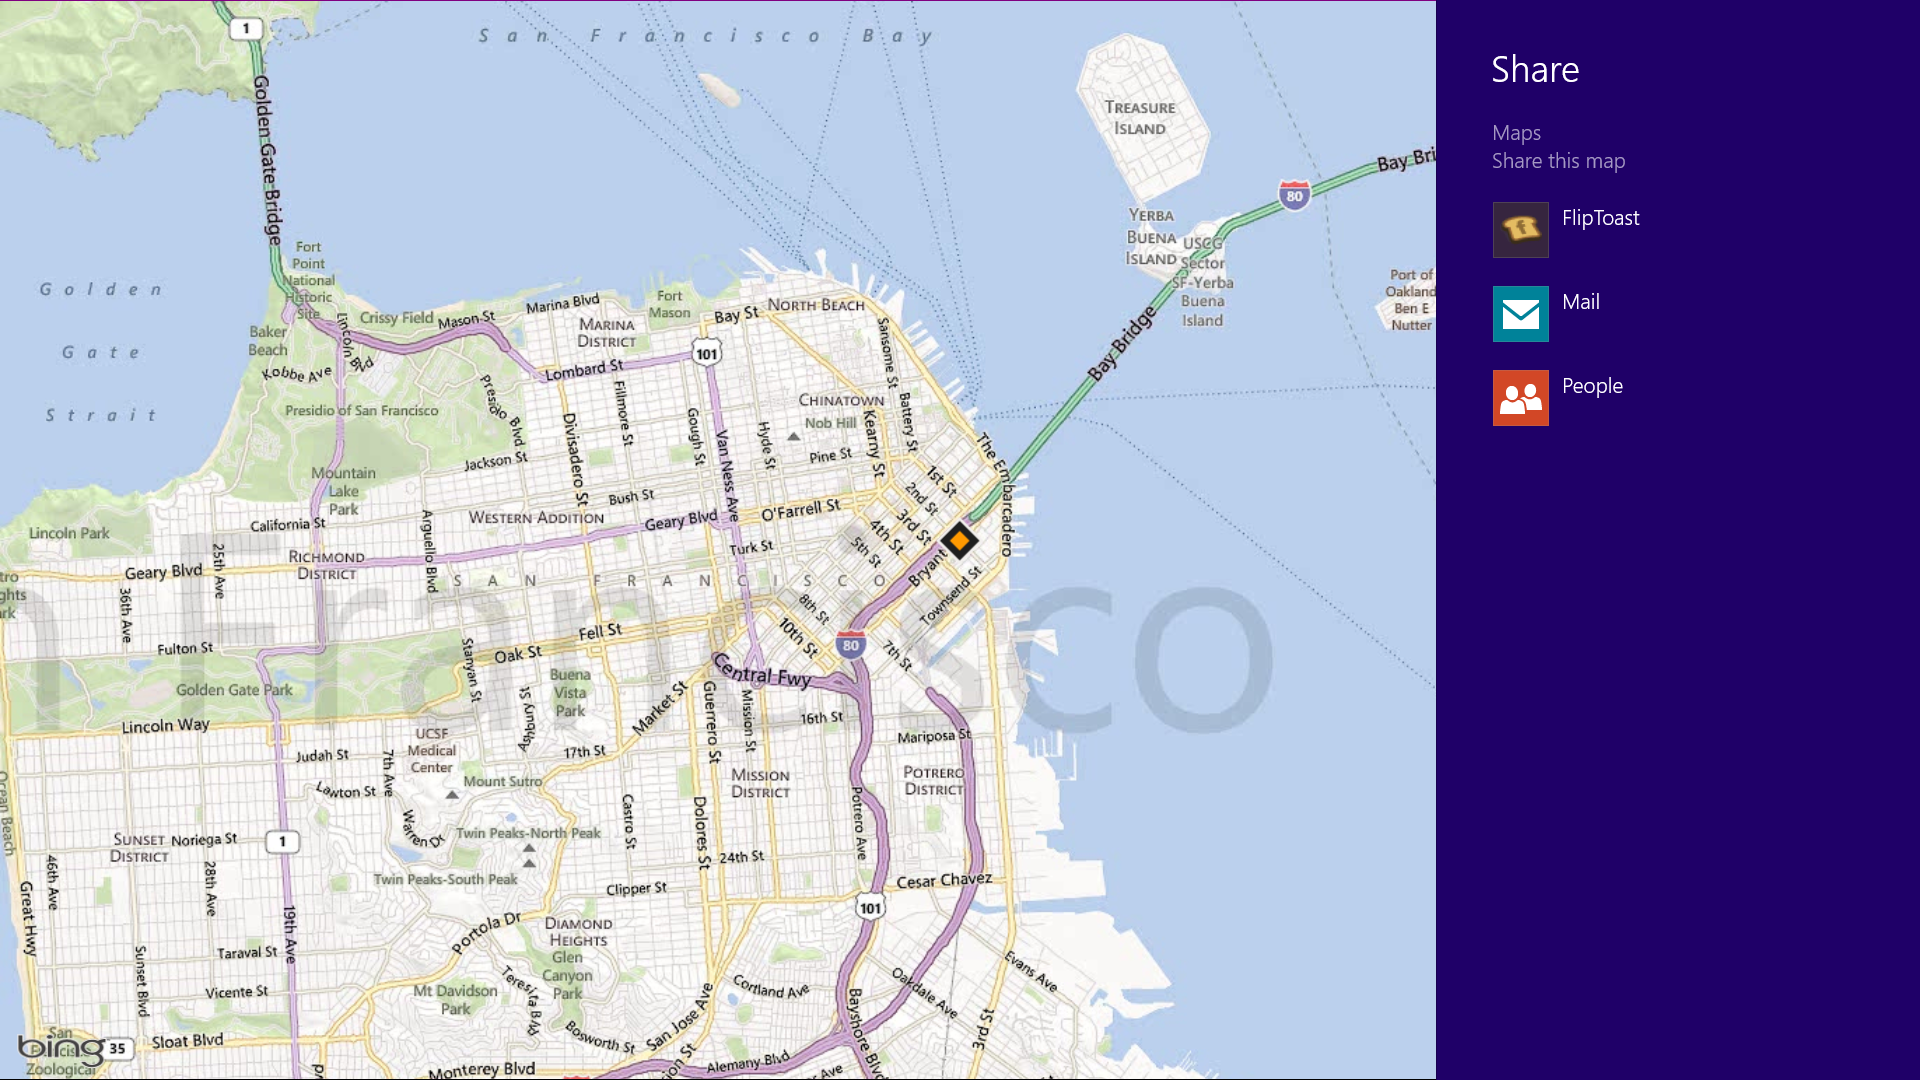
Share and share alike
Play with the Share charm in every app.
Windows 8 is Microsoft’s first social-media-aware PC operating system. Using the Share button located on the Charms bar, you can pick any number of elements from your Windows 8 Store apps—say, a location from your Maps app, a news story from the Finance app, or a even a contact from your People app—and then distribute that item to friends via other Windows 8 programs.
Perhaps most conveniently, you can quickly share a photo via email or Twitter, or to your own SkyDrive or Windows Phone. The Share button is contextual, and the more you use it, the more you’ll discover which apps share with each other, and which don’t. (Hint: None of your desktop apps offer sharing opportunities through the Charms menu.)
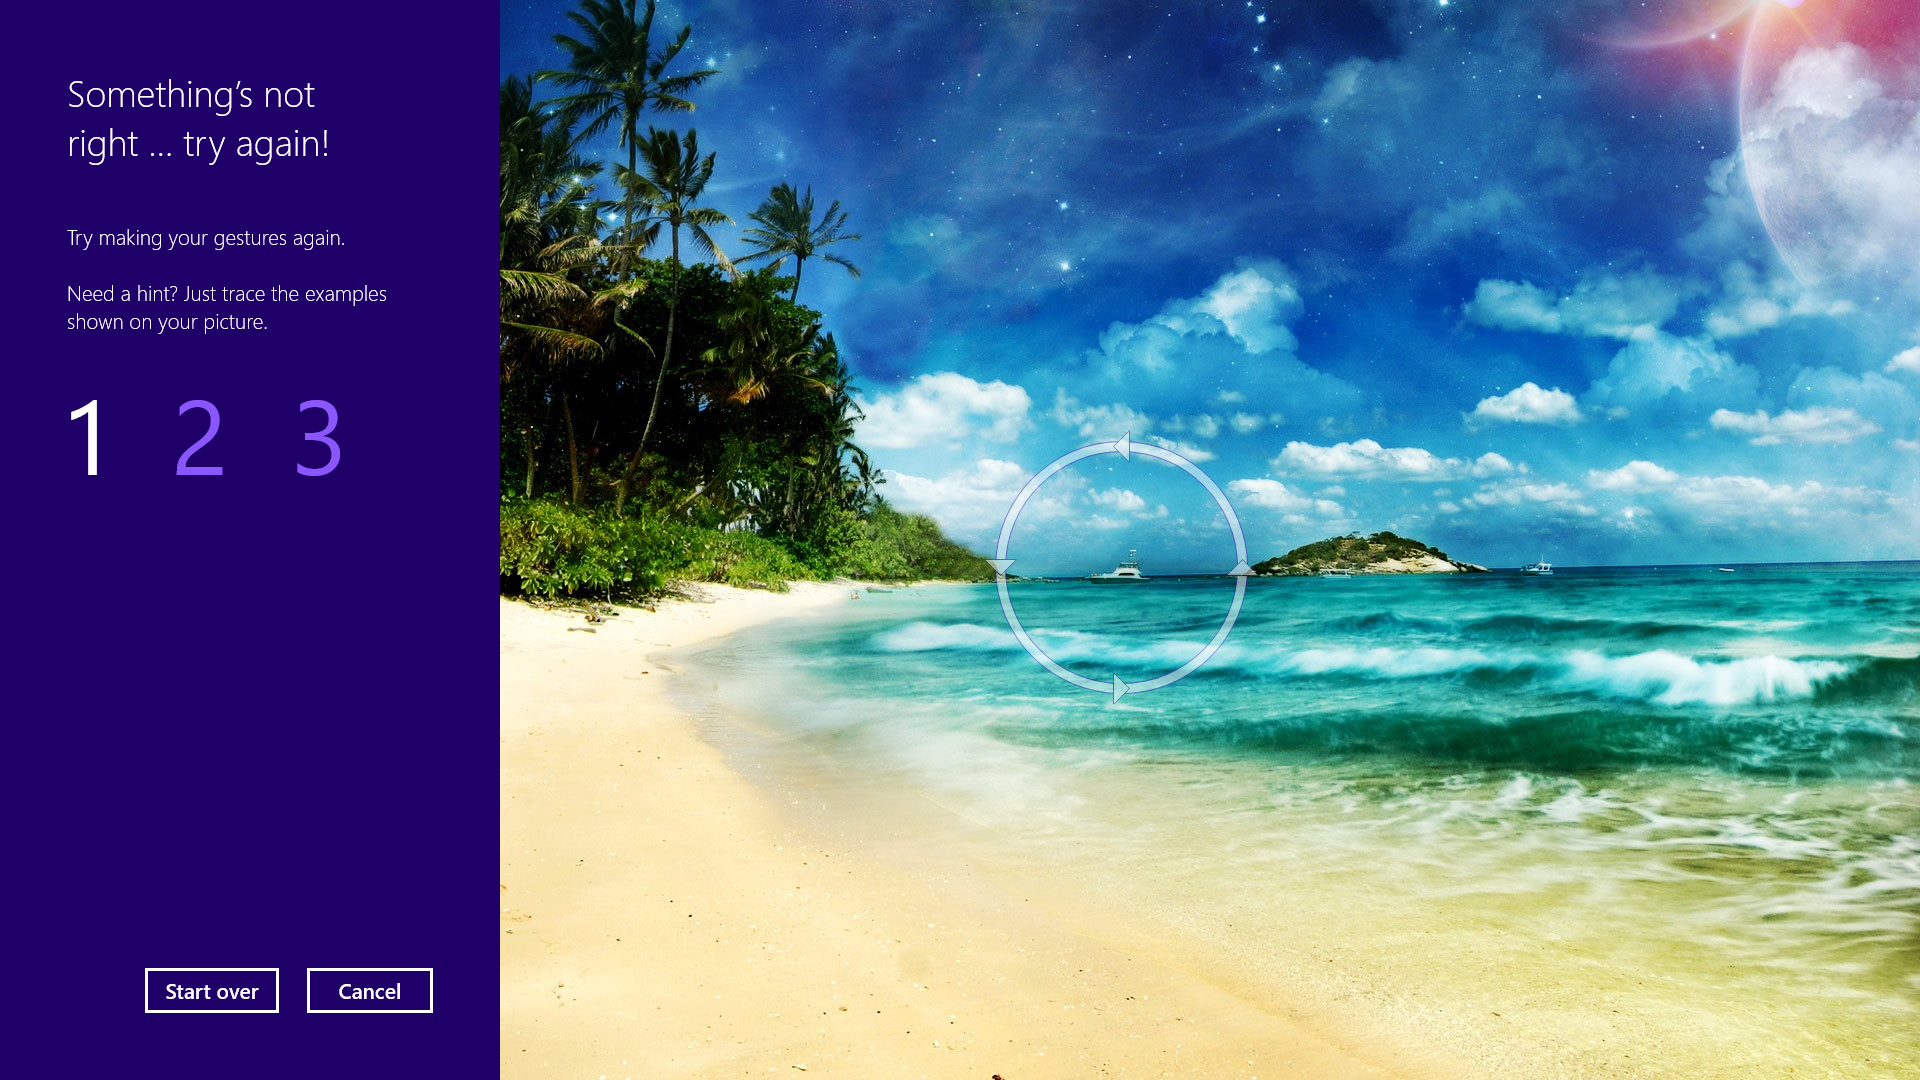
Create a picture password
A fun way to protect your system.
Using a picture password is a fun way keep your device secure while not having to remember a complex password. To enable it, press the Windows key + I to get to the settings charm. Click "Change PC settings" at the bottom right, and go to the Users tab. Under "Sign-in options" will be the "Create a picture password" button. This will give you the option to choose any picture, and then define three gestures anywhere on the image. Your gestures can be circles, swipes and clicks.
For example, to set a picture password for the image above, you could click on the highest palm tree, draw a circle around the island, and then swipe down from the lens flare in the upper right. Just beware: The direction of each gesture matters! After confirming it a couple times, your picture password will be set.
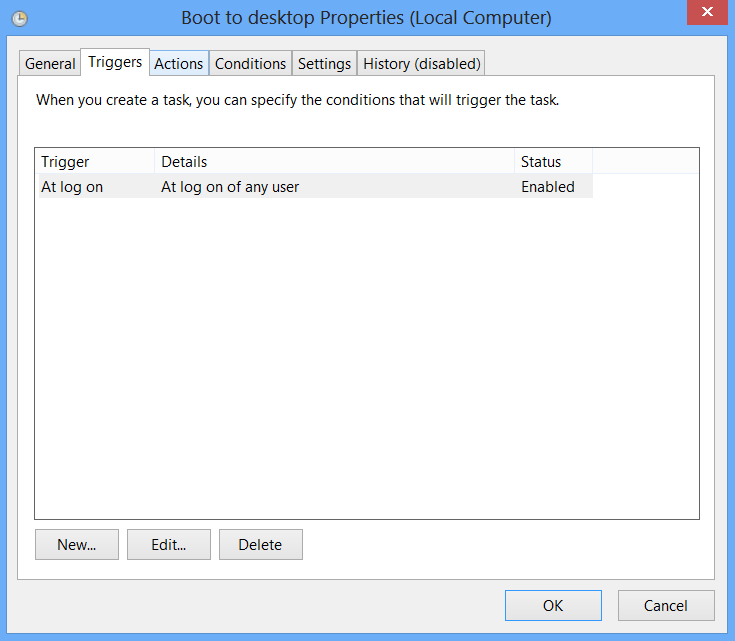
Boot to the desktop without an app
Skip the Start screen and get right to the Desktop.
One of biggest complaints about Windows 8 is that it boots straight to the Start screen—an annoyance for many committed desktop users. The Start8 utility helps you avoid this indignity (among other cool features), but you can actually boot straight to the desktop without installing anything extra.
Go to the start screen and type in "schedule" to search for Schedule Task in Settings. Click on Task Scheduler Library to the left, and select Create Task. Name your task something like "Boot to desktop." Now select the Triggers tab, choose New, and use the drop-down box to select starting the task "At log on." Click OK and go to the Actions tab, choose New,and enter "explorer" for the Program/Script value.
Press OK, save the task, and restart to test it out!
Log in without a username or password
To speed up the log-in process, you may want to disable the username and password log-in screen. You can do so by opening the Run window (press the Windows key + R) and typing in "netplwiz" to access the User Accounts dialog box. Uncheck the box near the top that says "Users must enter a user name and password to use this computer." ClickOK, and enter the username and password one last time to confirm your choice, and you are all set for easy access to your system.
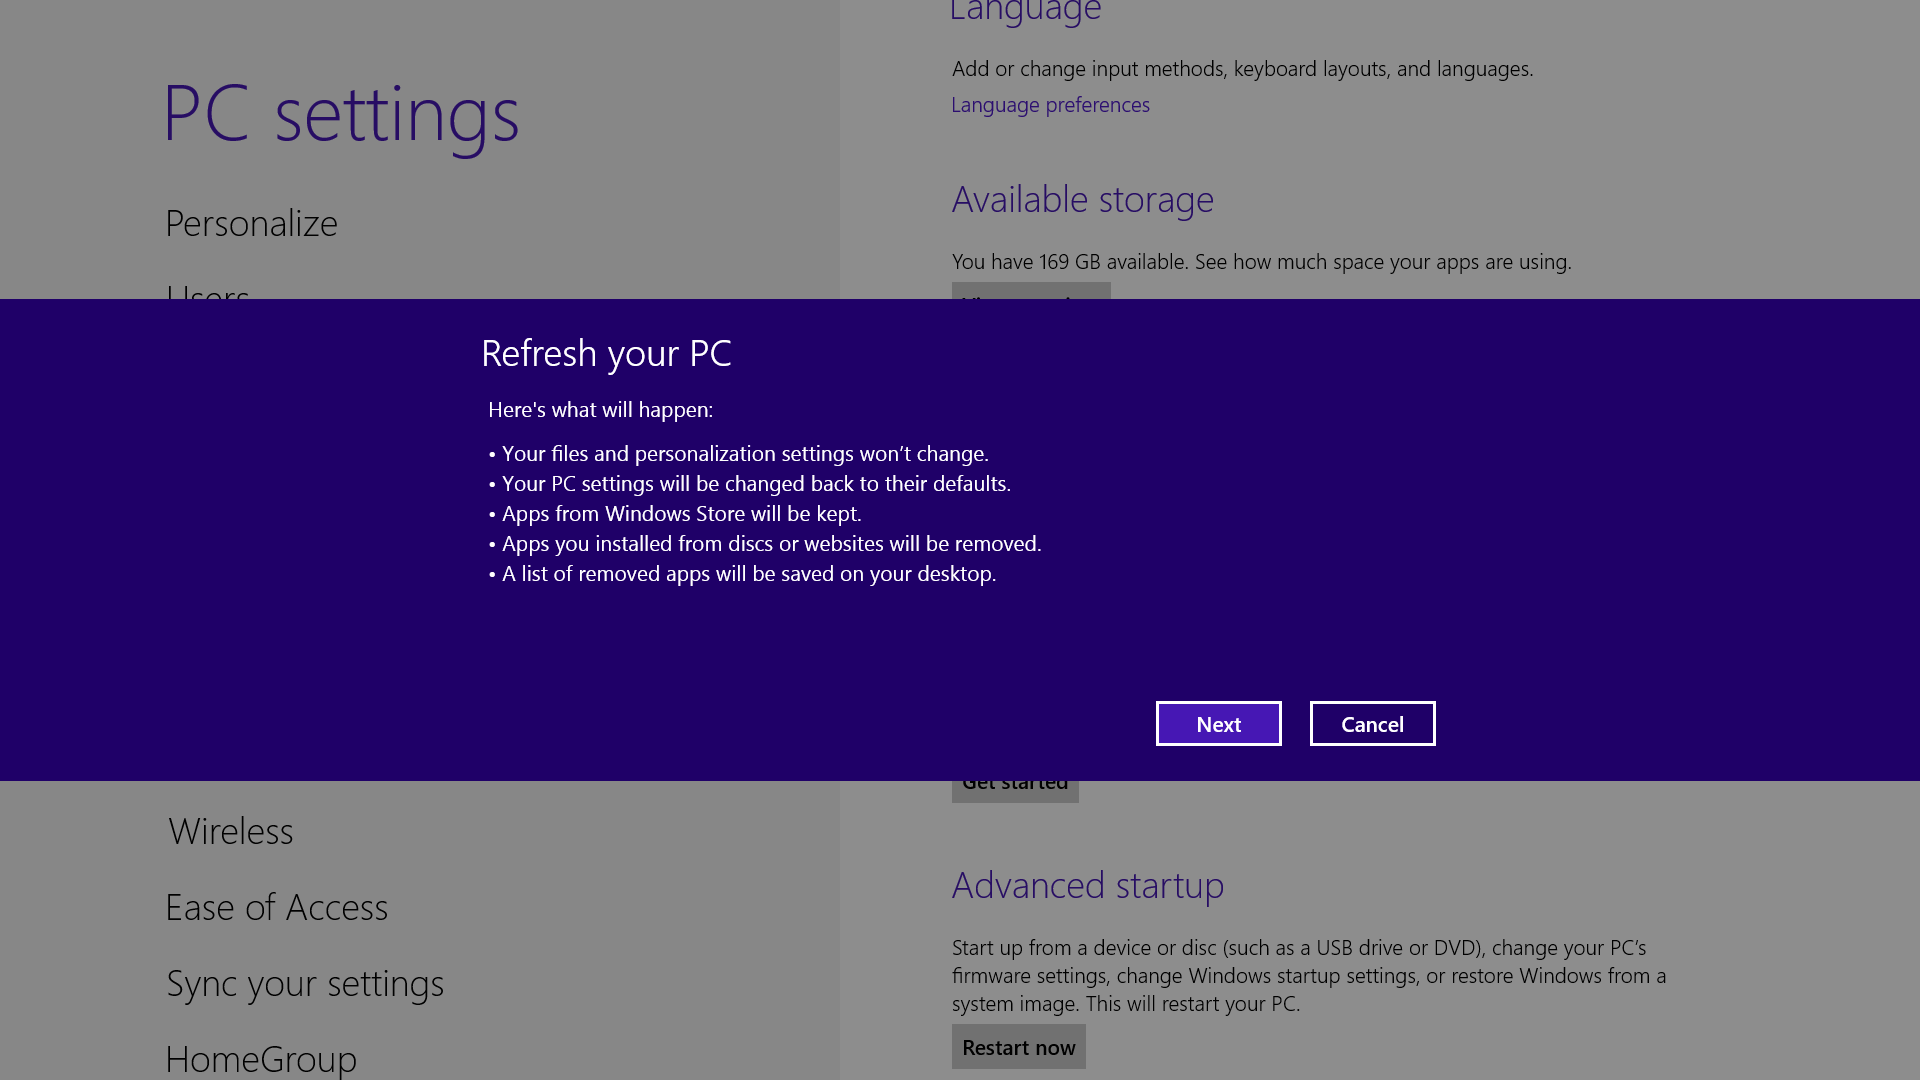
Refresh your PC
Enjoy a fresh PC without losing everything.
If your system is feeling a little sluggish, it may be time for a refresh. In the past we would have to find our copy of Windows 7, back up all of our data, and perform a fresh install to enjoy that back-to-factory-fresh feeling. But now Windows 8 allows you to perform a fresh install from within Windows without losing any data.
In order to perform the refresh, go to Settings and click the Change PC Settings tab near the bottom. Select the General tab and find the "Refresh your PC without affecting your files" section near the middle (you may also select "Remove everything and reinstall Windows" to get the true factory settings treatment). Select "Get started" and press "Refresh." After a few minutes the PC will restart, and you will have a fresh copy of Windows 8.
Start in Safe Mode
Safe Mode is a great way to get into your system when something won't allow you to start up normally. Troubleshooting becomes a breeze when corrupted drivers and files aren't loaded that prevents a system from functioning. It used to be as easy as pressing F8 when the system starts up, but doing so with Windows 8 will take you to Automatic Repair Mode. The trick to getting back to good old fashioned Safe Mode? Hold down the Shift key and press F8 while booting up.
This takes you to the Recovery mode. Select "advanced options," then "troubleshoot," then the "advanced options" again (there are a lot of advanced options). Select Windows Startup Settings and finally the Restart button. This will reboot the computer and give you the option to boot into Safe Mode.
If you need to get into Safe Mode from within Windows, open the dialog box (the Windows key + R) and type "msconfig" (no quote marks). Select the Boot tab and check the Safe boot box. The system will continually boot into Safe Mode until you go back and uncheck the box.
Turn Live Tiles on and off
Use the Live tile option to customize what you want to see.
When looking at the plethora of tiles on your Start screen, the view can get stagnant, despite all the pretty colors.This is where Live Tiles come in. They offer real-time data right on your Start screen, and you don't need to open any apps. For example, the Weather tile will show you the current conditions, and Mail will show you the subject of the latest message you've received.
You can customize which apps are live and which aren't by right-clicking on the tiles. A settings bar on the bottom will pop up with an option to turn the Live Tile on or off. Simply select the preferred option, and you're all set. Note, however, that not all apps have a live, real-time data-streaming option.
Find the Windows games folder
Currently, the games folder used in Windows 7 isn’t present in Windows 8. Fear not; if you install any current-generation PC game that would regularly save to this folder, the folder is automatically created. For a quick way to find it, right-click on the game icon on the Start screen and choose “Open file location” at the bottom.
Activate Family Safety
Let your kids play without having to worry.
Want to avoid some nasty surprises on your credit card? Create a separate, standard account on the device for your kids (Family Safety can't be applied to an administrator account). You can activate Family Safety by going to the Control Panel, User Accounts,and Family Safety, and selecting the account you would like to apply it to. From these settings you can get reports on the account's activity; set a level of Web filtering; set time limits; and enforce Windows Store, game, and app restrictions.
Shut down with one click
Easy to create button to shut down.
Windows 8 hides the Power button in the Settings menu, forcing a multistep process just to shut down one's PC. But thanks to a crafty shortcut trick, you can pin a Shutdown button right onto the bottom of your desktop. Here's how.
Create a shortcut on your desktop (right-click, go to New, then Shortcut). Enter "shutdown /s /t 0" (with no quotes, and, yes, that's a zero not an "O") as the location of the item, and press Next. Now name the shortcut (prefereably "Shutdown") and press Finish.
Right-click the shortcut, and navigate to Properties. Choose Change Icon in the Shortcut tab, and then OK to leave the warning box. Choose an icon of your choice from the list. In the screenshot above, you'll see we chose a Power button.
Right-click the shortcut again, and select Pin to Start. You can place the icon on your Start screen wherever it's convenient. Clicking it will instantly shut down your computer.


7 comments: